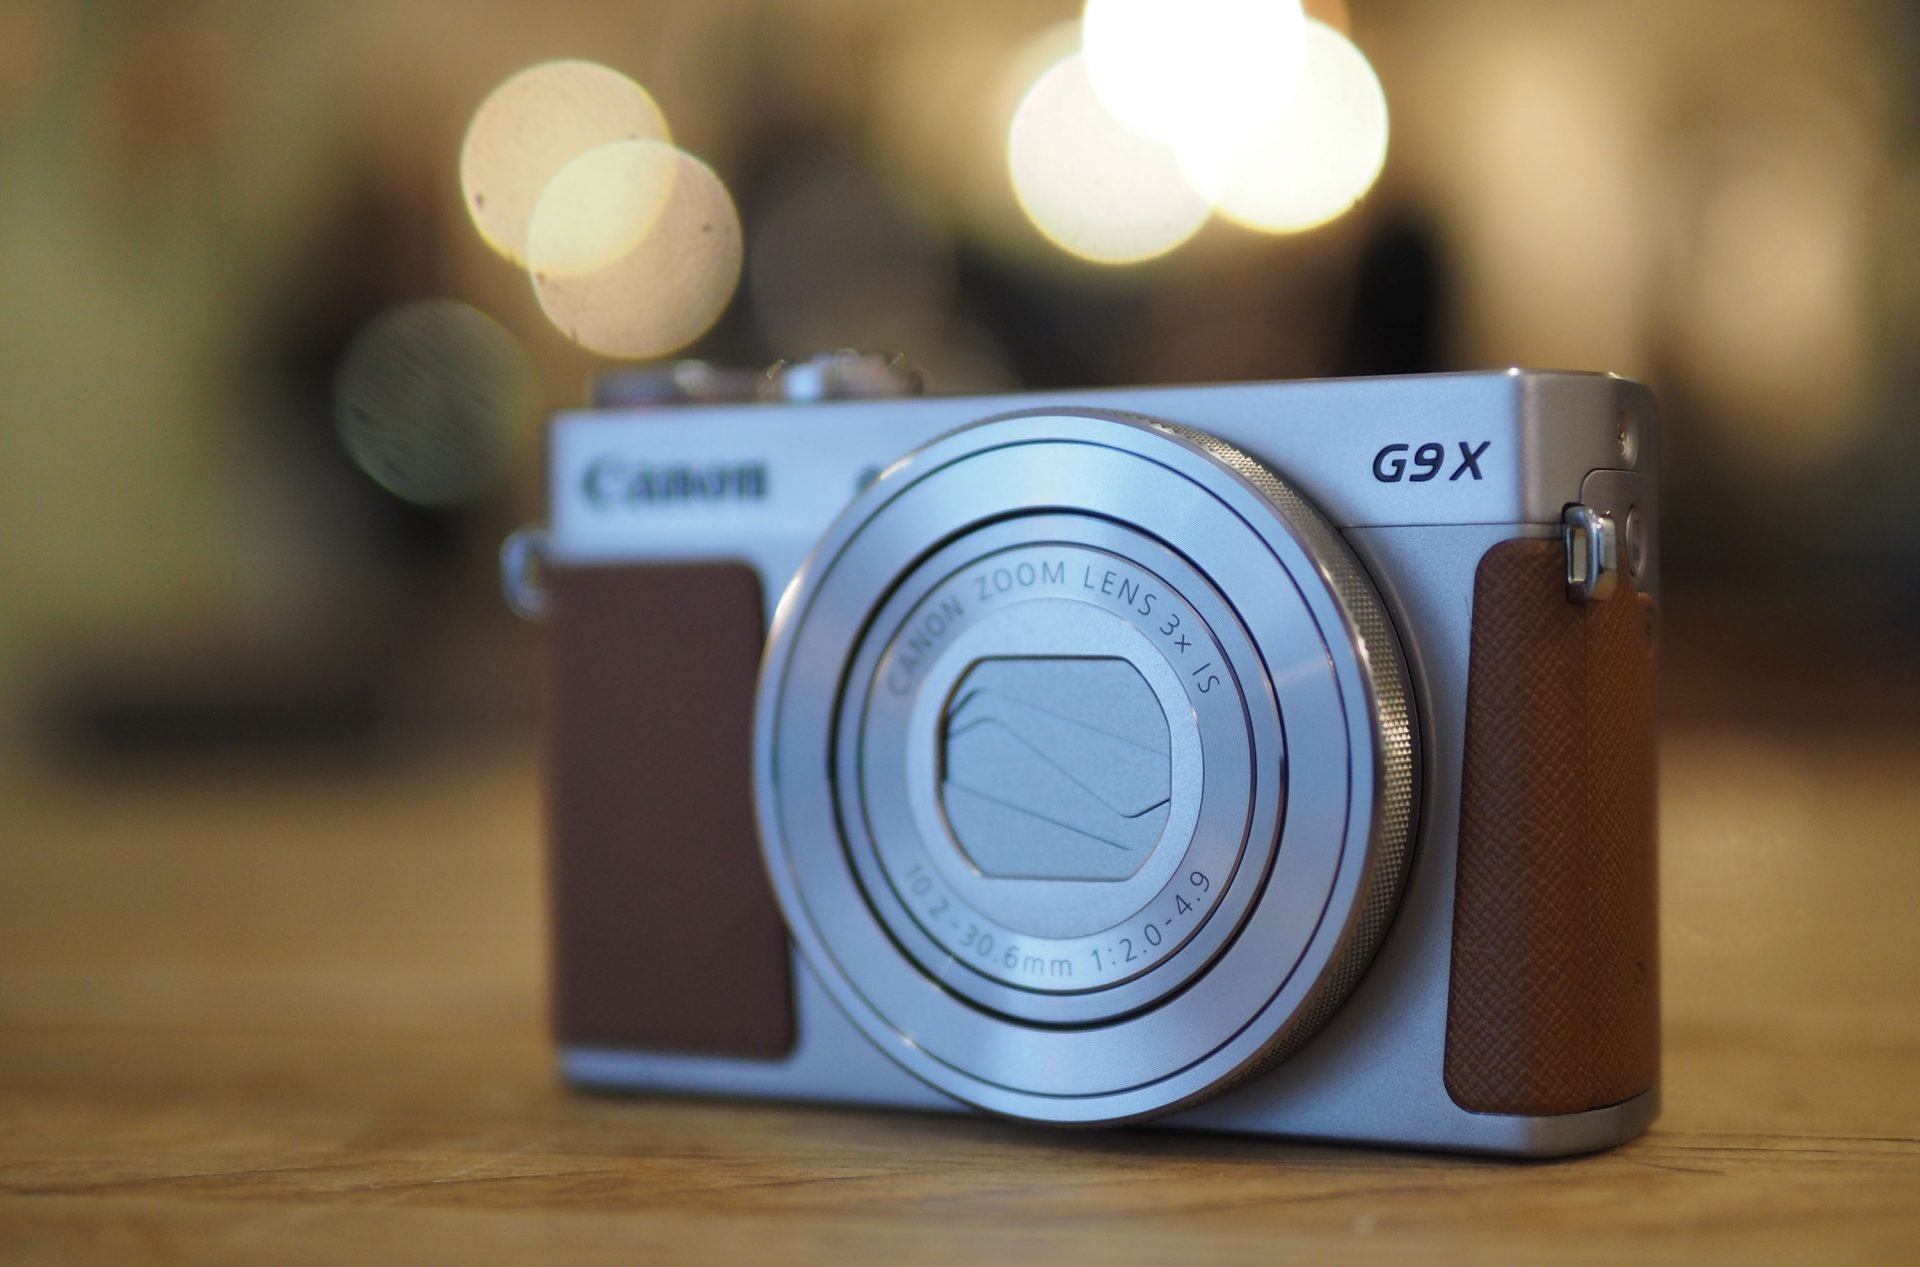
 Canon's PowerShot G9X is the slimmest traditional compact to feature a 1in sensor - giving it superior quality to most phones and compacts but without compromising its pocketability. Indeed the G9X is almost exactly the same size as Canon's earlier S120, despite sporting a sensor with roughly three times the surface area. As you'd expect for a small body with a larger than average sensor, the zoom range isn't huge - just 3x - but the 28-84mm range still covers most needs while the 5cm macro and f2 aperture at the wide end allow for respectable close-ups and relatively shallow depth-of-field effects. Impressively for its size there's a mode dial with a wealth of shooting options from full Auto to full Manual, while the touch-screen interface presents quick and easy access to all the settings. Indeed the combination of pocket size and the touch-screen makes it one of my favourite compacts around, although compare it closely with the chunkier G7X (Mark I or II) which squeezes-in a longer zoom and a tilting screen, often at a bargain price.
Canon G9X review
-
-
Written by Gordon Laing
In depth
The Canon PowerShot G9X is a slim compact with a larger than average 1in sensor. Announced in October 2015 alongside the higher-end G5X, it’s aimed at those who want a step-up in quality over a phone or typical point-and-shoot, but in the smallest possible body.
Canon’s certainly covering all bases with the PowerShot G series which now consists of five models. The oldest G1X Mark II remains the flagship with its larger 1.5in sensor and 5x zoom. The remaining four share the same 1in / 20 Megapixel sensor that’s proven so popular in Sony’s RX100 series, but with different bodies and lenses. The G3X offers the longest 25x optical zoom, while the G5X and G7X share the same 4.2x range but coupled with a viewfinder and compact body respectively. This leaves the new G9X as the smallest of the group, lacking any kind of screen articulation or viewfinder, but boasting the slimmest, lightest body of the series to date. Indeed it’s roughly the same size as the PowerShot S120, making it truly pocket-sized.
The small body and big sensor inevitably means some compromise with the lens, which at 3x / 28-84mm has the shortest range in the series, and at f2-4.9 quickly becomes dim at the long-end. But it does feature a simple interface, touch-screen, built-in Wifi with NFC, 5cm macro (at 28mm), lens control ring, 1080p video at up to 60p, built-in ND filter and the option of in-camera USB charging (while still being supplied with a ‘proper’ AC charger). Is the compact you’ve been waiting for? Find out in my in-depth review!

Canon PowerShot G9X video review
Canon PowerShot G9X design and controls
Canon’s PowerShot G9X is one of the smallest cameras to feature a 1in sensor, giving it an upgrade in low light performance over most phones and compacts without losing out on pocketability. Measuring 98x58x30.8mm and weighing just 209g including battery, it’s amazingly close to the 100x59x29mm / 217g of Canon’s S120 which was one of the smallest enthusiast-class cameras around.
Shave a couple of millimeters from the width of the S120, one from the height and add just under 2mm to the thickness and the G9X manages to squeeze-in a sensor with 2.8 times the surface area; it’s even a few grams lighter. Sure there’s other differences I’ll mention throughout the review, most notably a longer zoom range on the S120, but in terms of body size and sensor size, the G9X is a very compelling proposition straight out the gates.
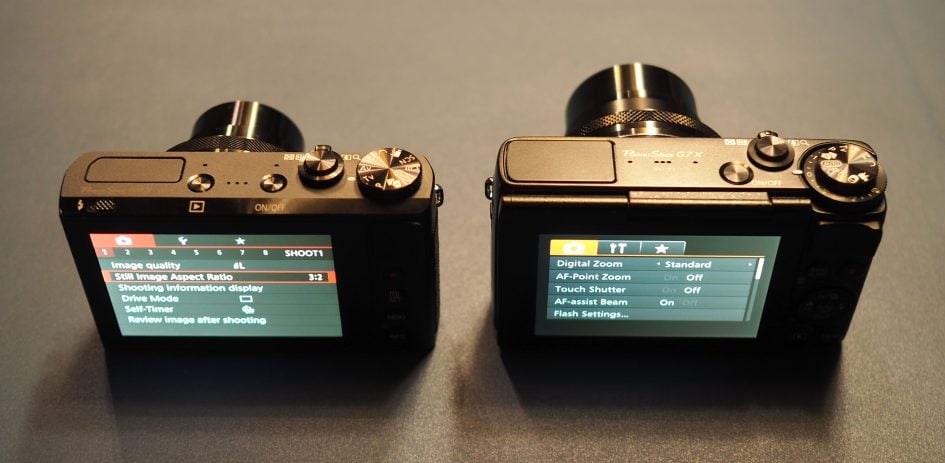
It’s also revealing to compare it against the PowerShot G7X which shares the same sensor, but measures 103x60x40.4mm and weighs 304g with battery. Placed side by side in the photo below, the G7X is noticeably wider, a tad taller, but most obviously almost 1cm thicker; indeed the total thickness of the G9X including its lens housing is roughly the same as the G7X main body thickness alone. The G9X is quite simply more pocketable than any of the other PowerShot G cameras, not to mention Sony’s RX100 series.
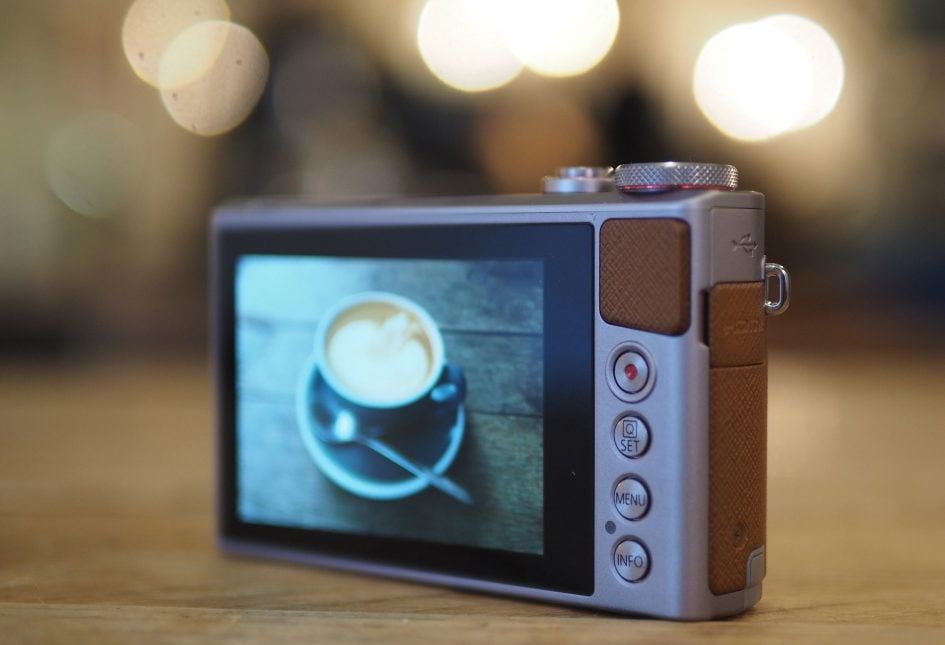
Small cameras are often compromised in handling, but Canon’s learned from previous models and for me the G9X actually delivers a more secure grip than the chunkier G7X and RX100 series. Those models have fairly featureless, smooth front surfaces with little purchase or friction for your middle finger. In contrast, the G9X features a textured faux-leather panel on both sides of the lens barrel which continues round the right side of the body and also adorns a small area in the rear top right corner for your thumb; it’s harder to see on the black model, but becomes obvious on the silver version I had for review where the grip surface is coloured brown. The textured surface provides sufficient friction for a nice secure grip.
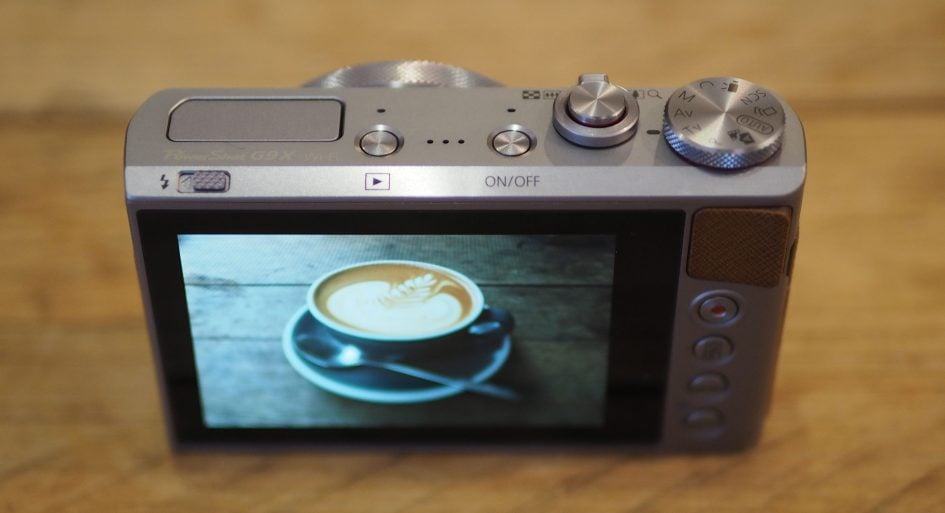
Canon’s also had a good think about controls on the smaller body and gone for a rather unique approach with only a handful of chunky buttons. On the top surface you’ll find dedicated Play and Power buttons, along with Canon’s usual shutter release with a zoom collar, albeit perched on top rather than flush with the surface on the G7X. Gratifyingly for a small body, there’s a mode dial on the right side of the top surface and while the exposure compensation dial of the G7X isn’t present here, I didn’t miss it a great deal.
The really radical part is on the rear surface where to the right of the screen there’s just four large buttons in a vertical column – that’s right, no cross keys or control wheel. The four buttons from top to bottom are for movie record, the Q menu, main menu and display Info. The movie record button can be customised with one of 26 functions. On the left side of the body is a dedicated SmartPhone button which speeds up the connection between the camera and a handset that’s been previously registered.
I’m pleased to report that like previous models there’s a control ring around the lens barrel which clicks when turned. This can automatically change its function depending on the shooting mode – for example aperture in aperture priority, shutter in shutter priority or zoom in Auto – but can alternatively be reassigned another function using the tough-screen interface.
Ah the touch-screen, for me the major benefit of the recent PowerShot G models over Sony’s RX100 series to date. Cycle-through the Info displays until a bunch of icons appear on-screen and you can lock the exposure, toggle the touch-shutter, switch between auto and manual focus or reassign the function of the control wheel all with simple taps. Along the bottom of the screen you’ll also see an exposure compensation scale, ISO value and, depending on the mode, the aperture and or shutter. One of these will be controlled by the front wheel, and while you can reassign which one for quicker access, you can alternatively just tap it on-screen and immediately adjust it.
Tap the Q icon in the corner of the screen or press the Q Set button and (depending on the mode) up to six icons are listed on the left side of the screen and five to the right, providing access to even more options. By default you can tap your way through the image quality, AF area, drive mode, self-timer, flash, white balance, colour effects, metering, focus distance and the built-in ND filter mode. It’s all very quick and easy with the touch-screen.
Enter the main tabbed menu system and you may at first wonder how you’ll navigate them without the traditional cross keys on the rear, but you can simply swipe between pages of options by touch and tap those you wish to adjust. The text may look quite small on-screen, but it’s still easy to touch the options to want without errors.
In playback you can swipe through images, pinch-to-zoom and drag to scroll around as you would with a smartphone or tablet. Canon also lets you configure four ‘L’-shaped gestures during playback which can, for example, kick-off a slideshow, erase the image or send it to a smartphone.
The best part of a touch-screen though is the ability to reposition the AF area with a simple tap, something I do regularly and find absolutely invaluable. It’s also immeasurably easier to tap out text with a touch-screen which makes entering Wifi and copyright details relatively pain-free. Meanwhile on the Sony RX100 IV, the priciest of all the 1in sensor compacts, the absence of a touch-screen makes the entering of details and adjustment of many options unnecessarily laborious. Indeed when shooting side-by-side with the RX100 IV and G9X, I was struck by how much easier it was to control and adjust the Canon over the Sony – and while that’s great news for the G9X with its simple layout, it’s really not-on for the RX100 IV when it’s aimed at demanding enthusiasts.
As for the panel, Canon’s fitted the G9X with the same 3in / 3:2 shaped / 1040k dot screen as the G7X before it. Meanwhile Sony continues to stick with a 3in / 4:3 shaped / 1228k dot panel. While the extra resolution of the Sony screen is down to the use of additional white dots, the hidden specification worth noting is the screen shape which is squarer than the Canon. Since the sensor in both models delivers 3:2 shaped images, the Sony RX100 series displays them with a thin black bar, reducing the active size a little, whereas on the Canon they fill the screen – and while this means shooting information has to be super-imposed on the image, it does mean the image itself is displayed larger.
An important difference between the G9X and the G7X, not to mention the RX100 series is the screen articulation, or lack of. On the G9X the body is too thin to accommodate a tilting screen so, like the S120, it’s fixed in place which inevitably makes composing at high or low angles less convenient. In contrast the thicker-bodied G7X and RX100 series accommodate vertically tilting screens; indeed the G7X and RX100 III and IV screens can even flip up by 180 degrees to face the subject for easy selfies or filming pieces to camera, something that’s not possible on the G9X. This, along with a more limited zoom range and focal ratio, are the major compromises of a camera with a slim body. So when choosing between the G9X and the thicker models you’ll need to weigh-up size against screen articulation and zoom capabilities.
In terms of display information, the Info button on the rear toggles between a clean view and two customisable views which can include shooting details, a live histogram, one of two alignment grids and or a single axis levelling gauge.
The slim body of the G9X means there’s no room for a viewfinder nor a hotshoe for accessories. I don’t think the target audience will be that bothered by their absence, but if you do want a viewfinder in a small camera you’ll need to spend more and accommodate a larger body than the G9X – for example, Sony’s RX100 III and IV, Panasonic’s Lumix LX100 or Canon’s G5X.
There is of course a popup flash on the G9X though, activated by sliding a small spring-loaded lever on the top surface. It’s fairly small, but sufficient for close-range illumination and adjustable by three levels if desired. If you find yourself wanting more power, Canon’s optional HF-DC2 mounts via a bracket.
Behind a flap on the right side of the body you’ll find a Micro USB port and HDMI Micro connector; there’s also built-in Wifi with NFC that I’ll cover in detail later in the review.
The NB-13L Lithium Ion battery and SD card are housed in a compartment underneath the camera, while the tripod thread is in-line with the optical axis of the lens. Canon quotes the battery as being good for around 220 shots and as usual supplies the camera with an external AC charger. But in a very welcome move, the G9X becomes one of the first Canon cameras (after the PowerShot N) to offer charging in-camera over a USB connection.
I find internal charging over USB so much more convenient as it allows me to top-up a depleted battery while I’m out and about, whether using a USB port on my laptop, a portable USB battery, or a port on a vehicle. I don’t need to remember my charger nor find an AC outlet to sit next to. Indeed in one hour I took the G9X from empty to at least two thirds full according to the battery indicator. Note: when connecting it to a laptop, you may need to ensure a memory card is inserted and the camera is on before charging takes place.
Now to be fair, this is an area where Canon is playing catch-up as Sony’s been offering in-camera charging over USB for a long time. Indeed on its latest models, including the RX100 IV, you can even shoot with the camera while it’s being powered externally, whereas on the G9X the camera stops charging if you start shooting with it. But I’m still delighted that Canon’s offering USB charging on more models and unlike Sony it still supplies an external AC charging unit as standard for those who prefer a traditional route.
Canon PowerShot G9X lens and stabilisation
The PowerShot G9X is equipped with a new 3x optical zoom, equivalent to 28-84mm with an f2-4.9 focal ratio. This is the shortest optical range of the PowerShot G series, and the focal ratio also slows down fairly rapidly as you zoom-in. This is inevitable for a camera with this size sensor and body though. If you want a large 1in sensor with a bright focal ratio throughout the range you’ll simply need a larger body to accommodate it. In terms of range though, the 28-84mm lens offers reasonable flexibility for general-purpose use – you can see an example of it below.
Above: Canon G9X coverage, left at 28mm equivalent, right at 84mm equivalent
The closest focusing distance when zoomed to 28mm is 5cm, extending to 35cm when set to 84mm. Here’s two shots from the G9X at or close to its minimum focusing distance when zoomed-out to 28mm and in-to 84mm. Both were taken with the camera’s maximum aperture of f2 and f4.9 respectively.

Above: Canon G9X at 28mm f2
Above: Canon G9X at 84mm f4.9
As for the focal ratio, it starts at f2 when the lens is set wide to 28mm, but like most compacts, begins to slow-down the instant you nudge the zoom control. The G9X loses a whole stop at just 33mm, closing to f2.8, then another stop to f4 at 45mm. The minimum aperture of f4.9 kicks-in at 70mm for the remainder of the optical range up to 84mm.
In this respect it’s not actually that much different to the older Sony RX100 Mark II, but the newer Sonys, not to mention Canon’s own G7X offer brighter lenses especially at the longer-ends of their ranges. The RX100 Mark III and IV both share a 2.9x optical range, equivalent to 24-70mm, with a focal ratio of f1.8-2.8. So they’re a tad brighter at the widest end, but over a stop faster at the long end. Meanwhile Canon’s G7X sports an even longer 4.2x range, equivalent to 24-100mm, with a focal ratio of f1.8-2.8; Canon’s G5X shares the same lens as the G7X, but houses it in a larger body with a viewfinder and fully-articulated screen.
There’s not a significant difference between these cameras and the G9X at their widest angles. Sure f1.8 is brighter than f2, but it won’t make much difference to your exposure or effective depth of field. As you zoom-in though, the chunkier models enjoy brighter focal ratios which allow a shallower depth-of-field and the chance to deploy a lower ISO. They’re definitely nice to have, but the price is of course a larger and heavier body, and in the case of the Mark III and IV Sonys, an even shorter telephoto than the G9X.
We can discuss numbers all day but I like to actually put these things to the test with direct comparisons as it’s the only way to demonstrate what to expect in practice. I tested the G9X at the same time as the Sony RX100 IV and while they’re aimed at different markets they do illustrate what you can expect from different lens specifications.
I’ll start with a macro comparison with both cameras positioned at their closest focusing distance of 5cm, their lenses set to their widest focal lengths and their apertures at their maximum values. So the G9X, below left, is operating at 28mm f2 equivalent while the RX100 IV, below right, is operating at 24mm f1.8 equivalent. I initially considered zooming the Sony to 28mm to match the focal length of the Canon, but like most compacts the lens aperture slows down quickly and the best result here was at the widest setting. Both cameras were focused on the ‘Y’ in Kenya on the coffee packet label. By the way I can highly recommend Horsham Roaster’s coffee!

Above left: Canon G9X at 28mm f2, above right: Sony RX100 IV at 24mm f1.8. Both from 5cm
As you can see above, the Sony has captured a slightly wider field of view thanks to its slightly wider focal length, but there’s not a huge difference in their actual depth of field. The blurring is fractionally greater on the RX100 IV above right, but I wouldn’t make a buying decision based on it.
Moving on, here’s how they compare in a portrait situation. This time I zoomed both cameras to their longest focal lengths and again opened the aperture to their maximum values. So this time we’re comparing the Canon G9X, below left, at 84mm f4.9 equivalent versus the Sony RX100 IV, below right, at 70mm f2.8 equivalent. Since the Sony’s focal length was shorter, I moved the camera closer to the subject to roughly match her position on the frame in both shots.
Above left: Canon G9X at 84mm f4.9, above right: Sony RX100 IV at 70mm f2.8
If both cameras were set to 70mm, the Sony with its brighter focal ratio will deliver a shallower depth of field, but revealingly the G9X manages to claw-back much of this difference thanks to its slightly longer maximum focal length. The result as seen above is again closer than you might think. As before the Sony RX100 IV enjoys fractionally more blurring in the background, but it’s subtle to say the least. Again I wouldn’t buy one over the other based on this alone.
The examples above also illustrate that even the top-of-the-range Sony RX100 IV isn’t capable of really blurring the background on portraits. For greater blurring you’ll need a camera with a larger sensor and a longer actual focal length lens with the same or larger focal ratio. Keeping with the smallish form factor I’d recommend something like Panasonic’s Lumix GM1 or GM5 with a 25mm f1.8 or 45mm f1.8 lens.
Before continuing, it’s also worth briefly mentioning the Canon S120, which shares essentially the same body size and weight as the G9X, but packs in a broader 5x / 24-120mm lens range with an f1.8-5.7 focal ratio. The reason the S120 can sport a longer range is its smaller 1/1.7in sensor. Sensor specs can be confusing, but the 1in sensor in the G9X boasts 2.8 times the surface area of the S120’s sensor, giving it greater light gathering power, even with its higher resolution. The actual focal length on the G9X is also longer for the same equivalent coverage, which additionally allows shallower depth-of-field effects. So the potential for blurring is even less on the S120 and really limited to just macro situations.
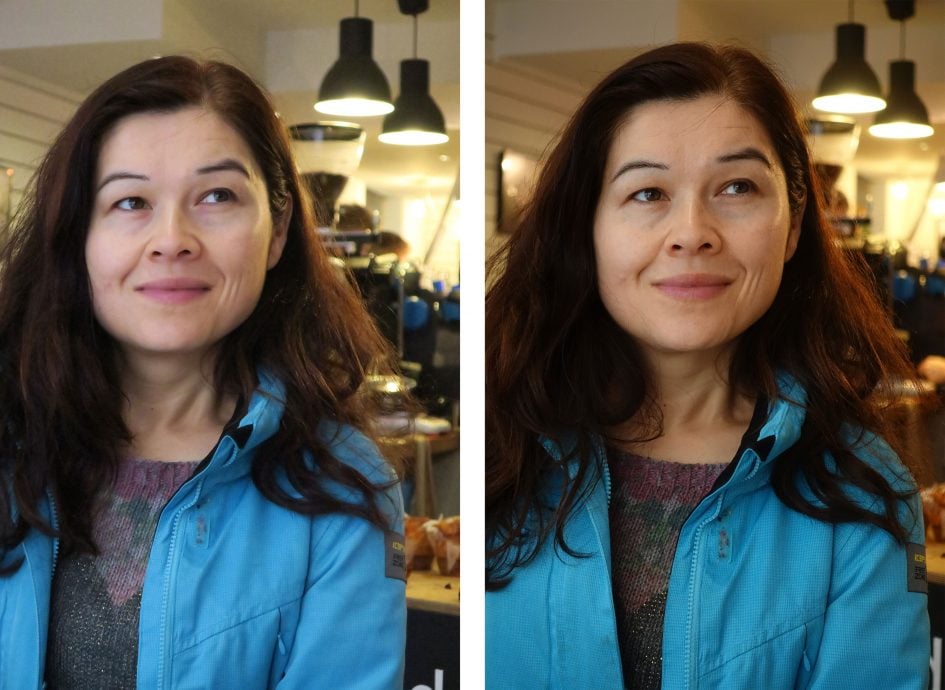
Moving on, the G9X lens offers optical stabilisation which Canon reckons is good for three stops. To put it to the test I took a series of shots at the longest 84mm focal length using steadily decreasing shutter speeds, first without stabilisation enabled, then with it active.

Above: Canon G9X stabilisation. Disabled (left), enabled (right). Both at 1/10 and 84mm
On the conditions of the day, I needed a shutter speed of 1/80 to handhold a shot at 84mm without stabilisation. With stabilisation enabled, I achieved the same result at 1/10, corresponding to three stops of compensation, and my results at 1/5 were also pretty good. It’s also worth mentioning that the textured surfaces of the G9X allow you to hold it more securely than you think for a camera of its size.
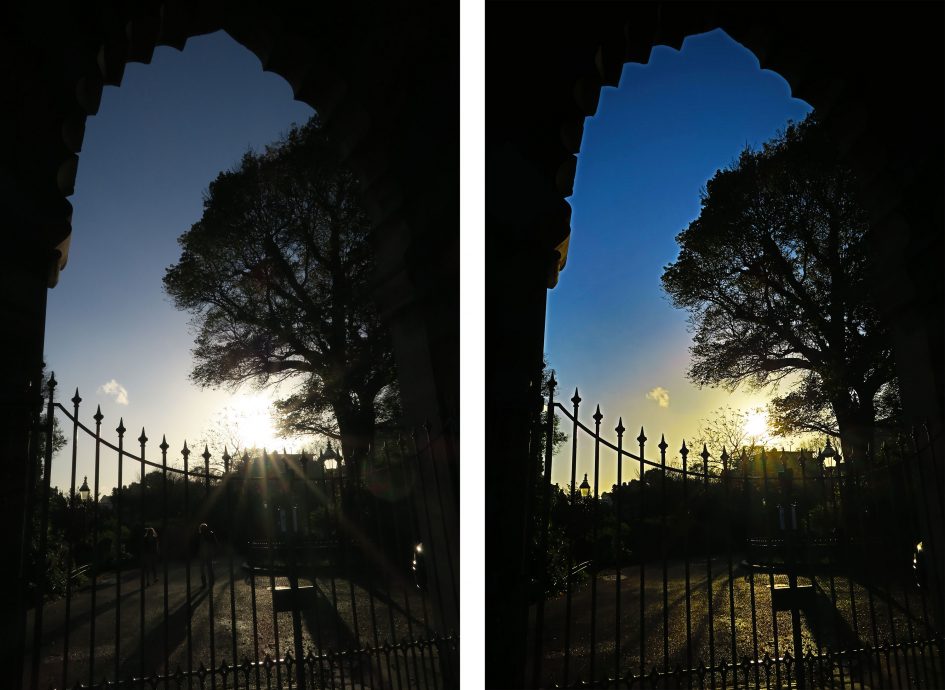
Rounding-off the lens specification is a built-in 3-stop ND filter which can be forced on, off or set to kick-in automatically depending on the light levels. This is handy for deploying large apertures in bright conditions and or ensuring an optimal shutter for movie motion. Once the light levels fall you can also use it for semi-long exposure photography.
One important difference between the G9X and the G7X is the ND filter can be set to enable automatically (for still photography) on the G9X; annoyingly you had to enable it manually on the G7X making it much more of a conscious operation. So when set to Auto, the G9X lets you shoot freely in a variety of conditions, safe in the knowledge you’ll almost never encounter a situation when there’s too much light; you will need to set it manually for movies though. A nice upgrade over the G7X. Note Sony’s RX100 III and IV also offer an Auto ND option.
Canon PowerShot G9X shooting modes
For a camera of its size and simple control layout, you’d be forgiven for assuming the G9X would switch between its shooting modes using the touch-screen interface. But Canon has managed to squeeze-on a proper mode dial on the top right surface, and there’s a full complement of options available.
There’s full AUTO, Canon’s Hybrid AUTO, Creative Shot, Scene, a dedicated Movie position, a Custom bank, along with Program, Aperture and Shutter Priority and full Manual. Shutter Priority and Manual offer access to the full exposure range of 1/2000 to 30 seconds, to which Manual adds a Bulb option that supports exposures up to four minutes and 16 seconds while the shutter is held; you can also start and end a Bulb exposure with taps on the touch-screen, but obviously you’ll need to be gentle to avoid wobbling it. Auto exposure bracketing is available for three stops in a range up to +/-2EV.
Set the G9X to AUTO and it’ll work out everything for you using scene detection which even accommodate and adjusts for subjects which are close, in motion, backlit, in shadow, smiling or even sleeping, including additional scenes for smiling or sleeping babies. It’s fun to point the camera at different subjects and see the scene icon adjust itself
Set the camera to Hybrid AUTO and it’ll exploit Canon’s Movie Digest feature to capture two to four seconds of video prior to you taking each photo. These are then compiled as the day goes on into a single movie which can give a fun behind-the-scenes. The idea is you normally spend at least a couple of seconds setting up a composition before taking photos and this is when people in portraits can often be most relaxed before their stock pose. When it works well, the compiled movies can certainly be fun, but at other times you may grab uncomfortable or messy footage, plus there’s the constant buffering taking place which will drain your battery sooner rather than later.
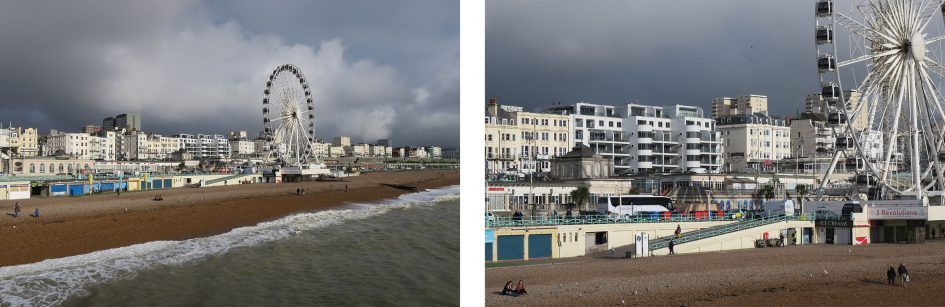
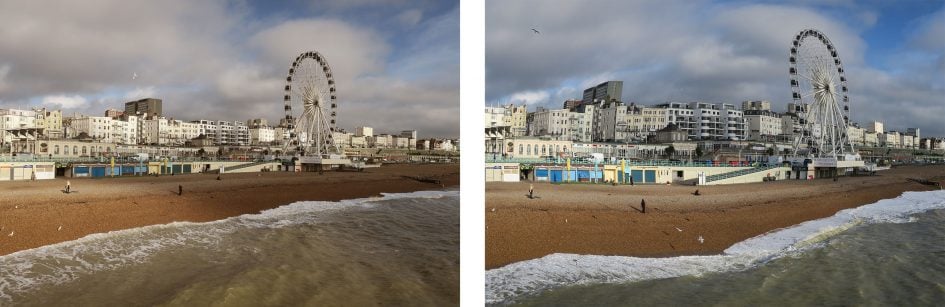
Next on the mode dial is Creative Shot which analyses the scene and grabs six shots with different effects, crops or rotations applied. Unlike the G7X, you can now choose for the six shots to be based on a certain style: Retro, Monochrome, Special or Natural, or you could go for the Auto which generates a selection. In practice it can work quite well and it’s almost like handing your camera to someone else to take a photo of a familiar subject as you’ll almost certainly end up with some views you hadn’t expected. Here’s what the G9X made of my standard test scene on Brighton beach in Auto Creative Shot.
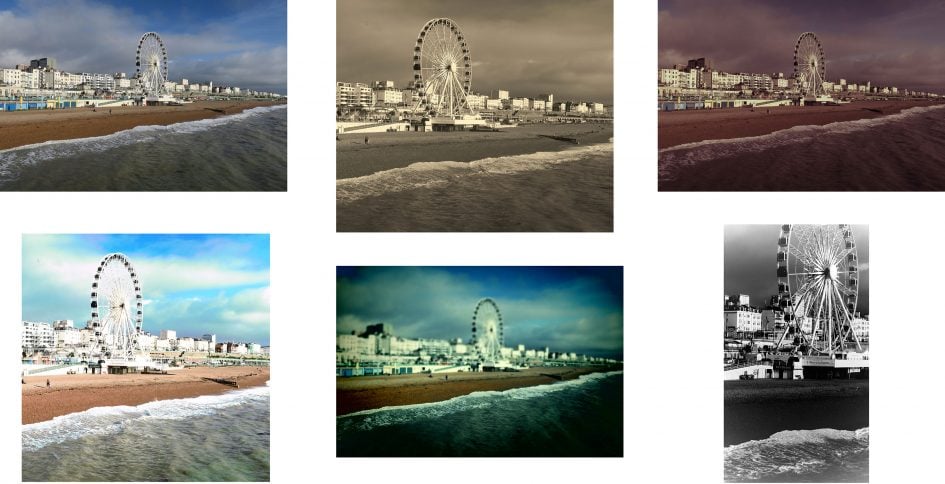
Above: Canon PowerShot G9X Creative Shot composite (Auto)
Set the G9X to the SCN mode on its dial and you’ll find a selection of effects mixed in with a handful of scene presets. Effects include HDR, Nostalgic, Fish-eye, Miniature, Toy Camera, Background Defocus, Soft Focus, Monochrome, Super Vivid or Poster, and these join Portrait, Star, Handheld Nightscene and Fireworks.
Turning the lens ring lets you adjust the intensity for most of them or settings for others. For example, in monochrome mode the ring lets you switch to sepia or blue and white effects, while in HDR mode you can choose the severity (or tastefulness) of the processing. Meanwhile the Miniature mode exploits the lens ring, touchscreen and Info buttons to adjust the position and thickness of the plane of focus along with the speed of playback if you end up choosing to film a movie. Like most Canon cameras, there’s a minor gotcha when filming Miniature movies though – if you want a widescreen HD video, you’ll need to first set the photo aspect ratio to 16:9. Here’s an example of a miniature movie below, followed by several examples of the other Creative Filters in action on still photos.
Above: Download the original file (Registered members of Vimeo only). Sample movie filmed with the Canon PowerShot G9X in its Miniature mode. As is often the case with Canon cameras, I had to set the photo shape to 16:9 in order to capture the Miniature effect in HD.
Above left: Nostalgic effect, above right: Fisheye effect
Above left: Super Vivid effect, above right: Poster effect
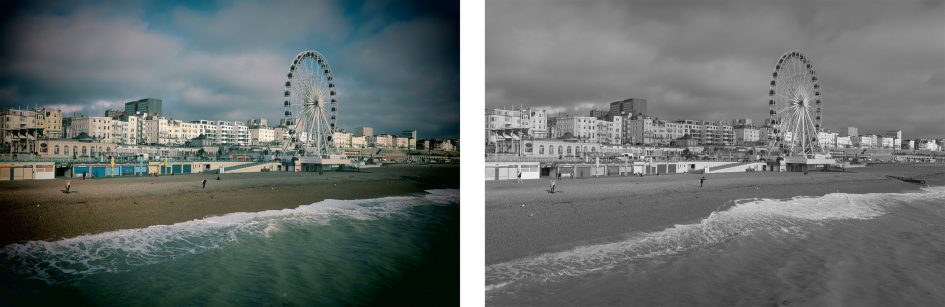
Above left: Toy Camera effect, above right: Monochrome effect
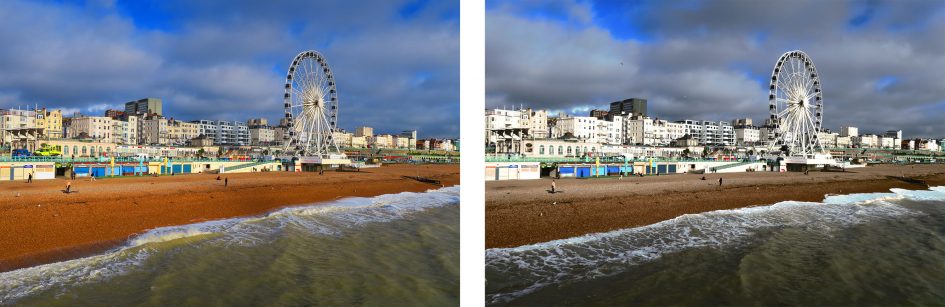
The HDR mode takes three exposures and combines them into one to extend the tonal dynamic range of the composition, generally revealing details otherwise lost in dark shadows or bright highlights. You can’t choose the ISO sensitivity, the bracketing depth or the exposure increment between the frames, but you can choose from five different processing effects: Natural, Art Standard, Art Vivid, Art Bold and Art Embossed. The natural option is fairly sympathetic, generally boosting detail in dark shadow and mid shadow tones. The other options deliver a far more stylised effect that may be right up your street, or may alternatively drive you onto another street entirely. Here’s an example showing Program mode below left and Natural HDR on the right.
Above left: Canon G9X HDR off, above right: Canon G9X HDR (Natural)
The G9X also inherits four Star modes for easy astrophotography of the G1 X II. First is Star Portrait, which composites three images taken in succession: the first fires the flash to capture the foreground person, while the second and third deploy longer exposures and high ISOs without the flash in an attempt to record the background. Once the process is complete the self-timer lamp blinks three times. The second option, Star Nightscape, is for capturing wide star fields and typically shoots a 15 second exposure at 800 ISO f2, which should be sufficient for basic Milky-Way type compositions. Below is an example I took from my backyard in Brighton, which sadly suffers from a fair amount of light pollution.
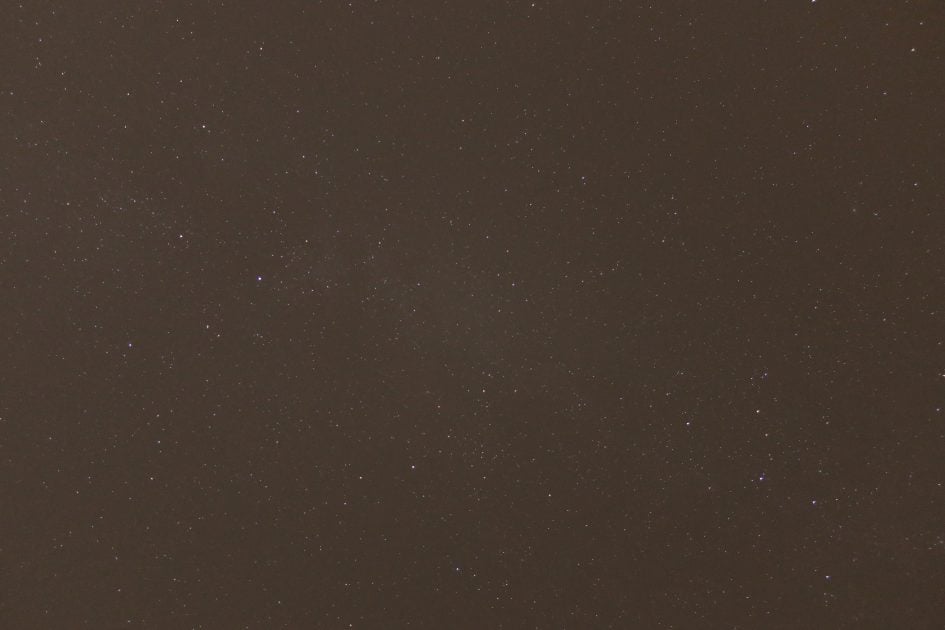
Above: Canon PowerShot G9X Star Mode
The third mode, Star Trails, takes a series of images over a period of ten minutes to two hours before then assembling them into one image – this allows you to record the effect of star trails without the battery drain of a very long single exposure. The second star mode is designed to capture star trails, taking a series of images over a period of ten minutes to two hours before then assembling them into one image – this allows you to record the effect of star trails without the battery drain of a very long single exposure. Here’s an example I shot again from my backyard in Brighton with the recording period set to one hour, and compared to the first example above, it’s a lot more forgiving on light pollution. Certainly unless you have very dark skies, this is the mode I’d go for when shooting stars with the G9X.

Above: Canon PowerShot G9X Star Trail mode
Finally the fourth option lets you record Star time-lapse movies, taking photos at intervals before assembling them in-camera into an accelerated video clip. Canon lets you choose 15, 30 or 60 second intervals, and a subsequent playback frame rate of 15 or 30fps. To test it I set the G9X to record for two hours with a 30 second interval and medium tail effect with the final movie being encoded at 12.5fps; towards the end of the capture period the cloud rolled-in, so I stopped the process a little early after around 100 minutes.
Above: Download the original file (Registered members of Vimeo only). Sample movie filmed with the Canon PowerShot G9X in its Star Timelapse mode. I set the G9X to record for two hours with a 30 second interval and medium tail effect with the final movie being encoded at 12.5fps; towards the end of the capture period the cloud rolled-in, so I stopped the process a little early after around 100 minutes.
Astro-photography can be very technical, but these modes make it very easy to capture good results and are well worth trying if you find yourself under clear (and ideally dark) skies.
Just before wrapping-up, here’s two handheld examples of the Fireworks scene in practice with the G9X. Here the G9X set its focus to infinity and selected a low sensitivity with a small aperture and 1.6 second shutter to record the colour of the bursts with a decent but not excessive trail length. The slow shutter speed means the handheld examples below understandably suffer from some shake and subsequent wobbling on the streaks, but the effect is still good. As always for the best results with fireworks, use a tripod.

Above: Canon PowerShot G9X Fireworks mode
What you still won’t find on the PowerShot G9X though is a panorama mode which automatically stitches images taken in a simple sweep of the camera. Why this continues to elude Canon is beyond me, and it’s disappointing not to have it on any of their cameras. Auto panoramas are now standard on Sony and Panasonic cameras, not to mention most phones and other camera brands. They’re a sore absence on the G9X, not to mention every other Canon camera at the time of writing, and I think most owners would prefer to have this in place before indulging in the more specialist star modes.
Canon PowerShot G9X focus and continuous shooting
The G9X, like most compacts, relies on a contrast-based AF system which hunts back and forth before confirming focus. In terms of AF area there’s two choices: 1-Point AF employs a single area which you can position almost anywhere using the touch-screen and adjust between two sizes, while Face+Tracking attempts to identify a human face and if none are recognised, falls back to an automatic selection using a seven by five array.
You can also choose between One Shot for single autofocus or Servo for continuous autofocus, although perhaps counter-intuitively if you want to keep focusing during a burst, Canon recommends coupling Servo with 1-Point AF rather than the tracking option. There’s also a Continuous AF option in the menus, but this refers to pre-focusing where the G9X makes adjustments as you compose, before you’ve even pressed the shutter release to accelerate the final process.
In One Shot mode, the G9X snaps-into focus fairly swiftly, certainly as fast as the higher-end Sony RX100 IV. If you have Continuous AF enabled for pre-focusing, the G9X normally locks-onto the subject regardless of focal length in less than a second with minimal hunting.
As I mentioned earlier, the joy of the touch-screen is being able to reposition a single AF area with a simple tap – something that’s still lacking even on the RX100 IV. If you prefer the automatic life though, the Face+Tracking option works well. I tried it at a number of events in low to very dark conditions and the camera locked-onto the faces of subjects successfully using its AF illuminator lamp where necessary – the biggest delay in these situations was waiting for the flash to recharge. You’ll also find it best to shoot at the widest focal length in dark conditions where the aperture is brightest.
The G9X also lets you register up to 12 faces of friends and family so that if they’re spotted on the frame with other people, they’ll be given priority for focus and exposure. It’s not a new feature but remains a useful one.
If AF Point Zoom is enabled, the G9X will temporarily enlarge the focus area for confirmation. If you prefer the manual life, a tap on the AF icon on-screen switches the G9X to manual focus complete with a focus distance indicator, optional enlarged view and if enabled, focus peaking too. It all makes for a practical manual focus experience which is also available for movies.
To test the continuous AF performance I photographed approaching cars and cyclists at modest speeds at up to 20mph. With the recommended settings of Servo AF and 1-Point AF, the G9X delivered varying results depending more on the size of the subject rather than its speed in my tests. I found it struggled with cyclists until they were much larger on the frame, but was more successful with vehicles which are obviously a larger subject. Despite Canon recommending 1-Point AF for continuous operations, I also tried the Face+Tracking mode and found similar results. In short the G9X will refocus on moving subjects if they’re big enough, but like most compacts it can be a hit and miss affair.
As for speed, the PowerShot G9X offers one burst mode, rated at 6fps without AF or 4.3fps with AF; if you have a compatible UHS-I card, you should be able to keep shooting virtually unlimited bursts of JPEGs. To put it to the test I fitted the G9X with a fast UHS-I card, set the sensitivity to 400 ISO and the shutter speed to 1/500, then timed a number of bursts.
With the quality set to Large Fine JPEG, I managed an initial burst of seven frames at just under 9fps before the camera slowed to 5.9fps for pretty much as long as I kept my finger on the shutter release button.
Switching to RAW sees the speed plummet: I captured ten frames in 11.63 seconds for a speed of one frame every 1.16 seconds which is nothing to get excited about. So if you’re into capturing a burst on the G9X, make sure you’re shooting JPEGs only. I can’t see this being an issue for the G9X’s target audience though.
Canon PowerShot G9X Wifi
The Canon PowerShot G9X is equipped with Wifi and NFC for wireless transfer of images between devices, GPS tagging, uploading to services and smartphone remote control. In this respect it sounds similar to earlier implementations not to mention other brands, but Canon’s made a number of improvements.
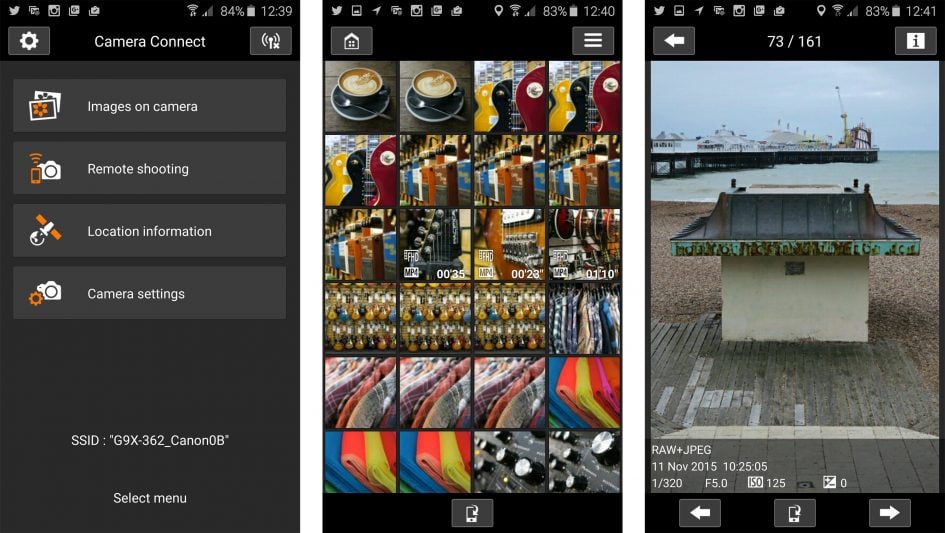
Canon now offers just one smartphone app for all its cameras: Camera Connect is available for iOS and Android devices, and I tested it on my Samsung Galaxy S6. The first thing you’ll need to do is download the app and if – like me – you have an NFC-equipped handset, you need only hold the camera and phone together for a couple of seconds to trigger the process.
In an upgrade over previous models, the G9X is also now equipped with Dynamic NFC which means you don’t even need the camera to be powered-on for it to initiate communications with an NFC phone – all you do is hold them together to trigger the download of the app and, once installed, bringing the two devices together will automatically start and connect their Wifi networks then fire-up the app – all ready for action without further interaction. If you’re in playback on the camera, you can touch the devices and again they’ll connect automatically before then asking you to select images on the camera for immediate transfer to your phone. These processes are much simpler than before where you had to manually start Wifi then connect the devices before the app would offer any control or transfer. While Sony’s NFC implementation is arguably even more direct, I have no complaints with Canon’s new approach. And as before if your phone doesn’t have NFC, you can initiate the process using the smartphone button on the side of the camera.
Once connected, the Camera Connect app offers four main options: Images on Camera, Remote Shooting, Location Information and Camera Settings, although the latter wasn’t supported for the G9X. Clicking Images on Camera presents a page of thumbnails to scroll through or select for further information and subsequent transfer to your phone; when transferring images you can choose to resize it to 3 Megapixels or go for the original 20 Megapixel file. RAW files aren’t visible for transfer, but movies are, although the app will first convert 1080p footage to 720p whether you like it or not. At least you can get video from the camera onto your phone though, unlike many apps.
Choosing Remote Shooting fires-up a live view from the camera with the chance to tap to refocus anywhere on the composition; it’s worth remembering at this point that while the G9X doesn’t have an articulated screen, once it’s under remote control you can of course easily compose at high or low positions by simply using your phone’s screen. There’s also a slider to operate the optical zoom remotely if desired.
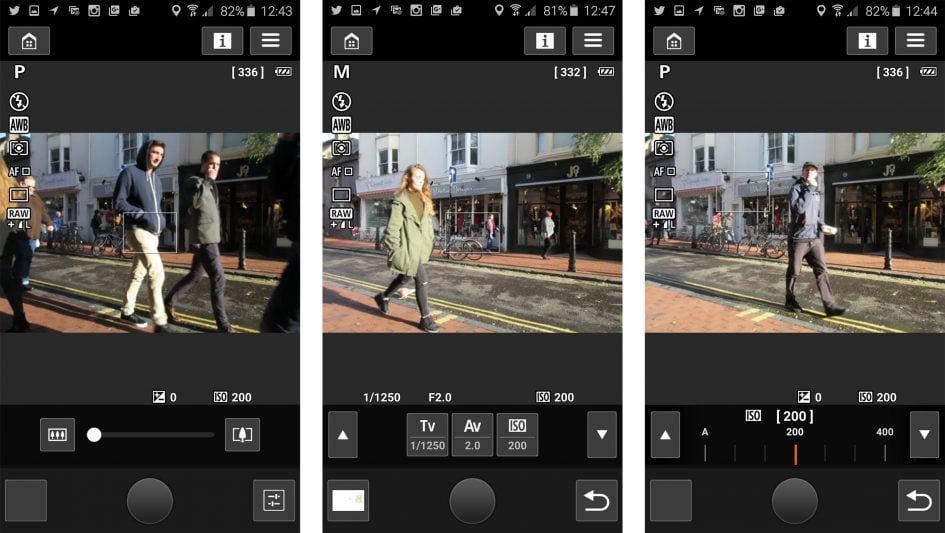
On the previous Camera Window app on the G7X, that’s as far as remote control went, with no chance to adjust the exposure. In contrast, the newer Camera Connect app offers manual control over the aperture, shutter, sensitivity and compensation, depending on the position of the exposure mode dial on the camera. For the maximum control, turn the dial to Manual, although even in the auto and semi-auto modes you’ll still have remote control over the ISO and exposure compensation. You can’t sadly can’t trigger a movie recording, nor change the camera’s exposure mode remotely, but it’s quick enough to exit Remote Shooting, turn the dial and enter Remote Shooting again without having to disconnect or leave the app.
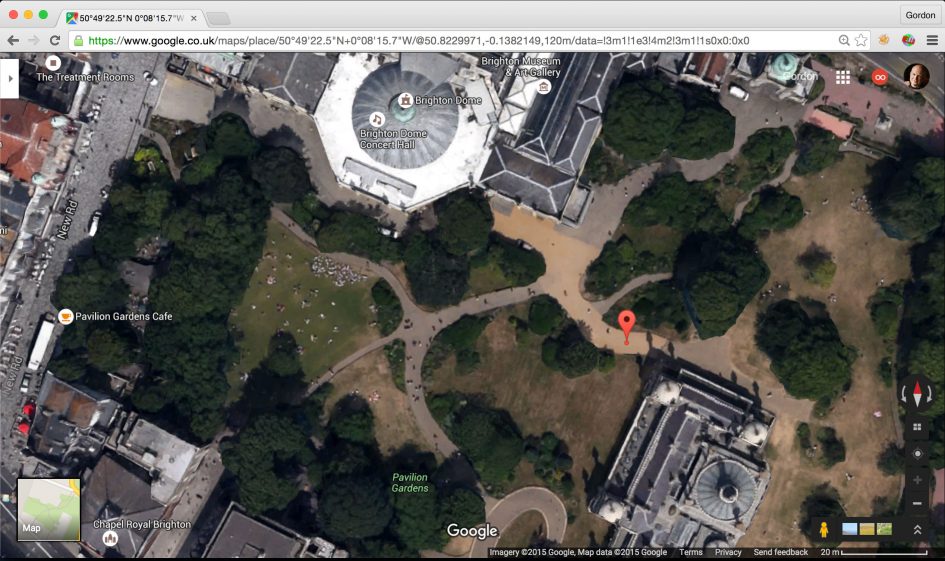
The third option is Location Information which simply lets you start recording a log using your smartphone’s built-in GPS, then send location information to the camera over Wifi to tag relevant images. Here’s one I took in Brighton where the location is accurate – or at least as accurate as the phone supplies.
So by improving its NFC implementation, Canon’s made the connection process much quicker and easier with the G9X, while the latest Camera Connect app now offers full manual control over exposure. There’s minor annoyances like not being able to initiate a movie recording or change the shooting mode remotely, but otherwise the Canon Wifi experience is now up there with the best of its rivals.
Canon also supports the wireless transfer of images to Mac or Windows systems if the camera and computers are connected to a mutual wireless network. You can alternatively connect to wireless printers or even send images direct from the camera to sharing services albeit via Canon’s Image Gateway service. Personally I find the online sharing and captioning process much easier on a phone, so I mostly copy images between the camera and phone before letting the latter manage the final upload and sharing.
Canon PowerShot G9X movie mode
The PowerShot G9X can record Full HD video with stereo sound captured by the built-in microphones, and you can optically zoom the lens while filming. You can start recording in any mode by simply pushing the red record button on the rear, but by first turning the mode dial to Movie, the camera unlocks advanced options.
For example when the G9X mode dial is set to Movie you can switch the camera between auto and manual exposure, the latter allowing you to set the sensitivity (up to 6400 ISO), shutter and aperture; there’s even an Auto ISO option in manual, allowing you to fix the aperture and shutter and let the camera adjust the sensitivity for the light levels. Impressively you can also use the touchscreen to make silent adjustments to the aperture, shutter and ISO while you’re filming. You can also deploy the built-in ND filter for movies, although there’s no Auto option – it’s either on or off.
The Movie mode also doubles the maximum frame rate from 25p / 30p to 50p / 60p, depending on the TV region set. Usefully the movie mode also reformats the screen to the video aspect ratio, which for HD is 16:9, allowing you to compose properly before starting the recording. Other frame rates include 1080 / 24p (when set to NTSC video) and 720p or VGA at 25p / 30p depending on TV region.
In terms of focusing it’s possible to set the camera to auto or manual, and if the latter you can adjust the focusing distance using the touch-screen interface while filming; during this process you’re guided by an on-screen distance bar, and if you like you can also enable focus peaking to highlight the edges of areas in focus. The ability to adjust manual focus distance wasn’t available on the earlier G7X and a nice enhancement here.
When set to AF you can use the touchscreen to pull-focus to different subjects, a useful feature that’s not available on cameras like Sony’s RX100 series to date which of course lack touch-screens.
Now let’s check out some sample movies!
Above: Download the original file (Registered members of Vimeo only). Sample movie filmed with the Canon PowerShot G9X in its Manual Movie mode which lets you set the aperture, shutter and sensitivity. I filmed this at 125 ISO and the lens at f5. During the clip I zoom the lens to the maximum optical focal length and back again.
Above: Download the original file (Registered members of Vimeo only). Handheld movie filmed with the Canon PowerShot G9X in its Standard Movie mode which sets the exposure for you. During the clip I zoom the lens to the maximum optical focal length and back again. Please forgive the wobbling – it was very windy and cold that day!
Above: Download the original file (Registered members of Vimeo only). Sample movie filmed with the Canon PowerShot G9X in its Manual Movie mode which lets you set the aperture, shutter and sensitivity. I filmed this at 200 ISO with the lens zoomed-out to 28mm equivalent and the aperture set to f2. In the clip I use the touch-screen to ‘pull-focus’ from the nearby subject to the background and back again. It works fairly well, but you can see the focus breathing throughout, hunting slightly to ensure it’s in the best position. You don’t notice it on the small screen of the camera, but once on a larger device it can be distracting. I should also mention the G9X could sometimes pause for some time before refocusing in other tests where I moved the camera to point at a different subject. I wouldn’t say it’s bad compared to other cameras in this regard, but it’s not amongst the more confident models, at least in my continuous AF tests here.
Above: Download the original file (Registered members of Vimeo only). Sample movie filmed with the Canon PowerShot G9X in its Manual Movie mode which lets you set the aperture, shutter and sensitivity. I filmed this at 800 ISO and the lens zoomed-out at f2.
Now it’s time to check out my quality page, mu sample images or skip back to my verdict!


